You can export outputs that are specified within a Time History Result to an MS-Excel spreadsheet file. This export can be set to occur automatically at the end of a simulation, or can be triggered manually while in Result or Scenario Mode The state of a model when it contains scenario results, allowing multiple scenarios to be compared.. In addition, when running multiple scenarios, scenario A specific set of input data (and corresponding outputs) for a model. Multiple scenarios can be defined for a model. Different scenarios within a model are specifically differentiated by having different values for one or more Data elements. comparisons can be written to the spreadsheet.
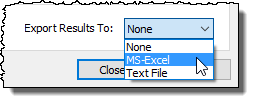
To enable this capability for a Time History Result element A Result element that shows the history of a particular output as a function of time., select "MS-Excel" from the Export Results To drop-list at the bottom of the Time History Result element dialog:

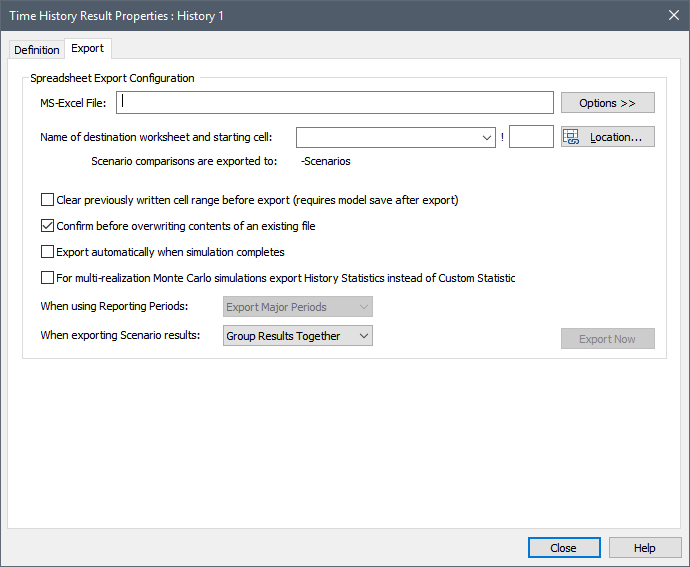
By default, this is set to "None". When you select "MS-Excel", an Export tab is added to the dialog:

You must first specify the Excel filename to which you wish to export. You can enter the name of a Microsoft Excel spreadsheet file to which you wish to link by pressing the Options >> button. This will provide options for either selecting an existing file, or creating (and then selecting) a new file. You can also type in the name of a file directly. In this case, you must provide a full or relative path (relative to the model file).
The Excel file does not need to exist prior to the export. If you type in a file that does not exist, GoldSim will create it at the time of export. The filename that you enter can contain one or more of the following keywords Text delimited by the % symbol (e.g., %x_unit%) that can be used when creating chart styles to insert context sensitive text (e.g., for axis labels). which will be replaced with the appropriate text at the time of export:
| Keyword | Description |
| %en% | The name of the Result element |
| %filename% | The name of the GoldSim file (without the extension) |
| %rundate% | Date simulation was started (displayed using Regional time format settings) |
| %runtime% | Time simulation was started (displayed using Regional time format settings). |
If the file exists at the time of export, it will be overwritten by the new data. If Confirm before overwriting contents of an existing file is checked, GoldSim will confirm before doing so. Note, however, that for existing spreadsheet files, GoldSim only overwrites those cells to which it is specifically exporting results. It does not overwrite any other cells in the file. In some cases, this could lead to situations where only a portion of the data in a particular row or column is overwritten (e.g., if the number of timesteps is changed between simulations), and this has the potential to create confusion. To prevent this, you should check Clear previously written cell range before export. If this is checked, GoldSim clears out all the cells from the previous time it exported from this Result element before writing the new results.
Note: In order to be able to clear cells that were previously written to, GoldSim must "remember' the cells to which it has previously written by saving this information with the file after the export has taken place. As a result, if you carry out an export, and then close the file without first saving it, this information is lost (i.e., GoldSim does not "remember" the cells to which it has previously written). Hence, to take advantage of this feature, you should always save the model after you carry out an export.
In addition to specifying the Excel filename, you must also specify the Name of destination worksheet and starting cell (the sheet and starting cell) where the data is to be exported. If the Excel file already exists, you can use the Location... button, which opens the spreadsheet and provides a dialog allowing you to directly select the desired cell using your mouse. If the Excel file does not exist, you must manually enter the sheet name and starting cell.
Note: Scenario results are exported to a different sheet. In particular, the name of the sheet is "Sheetname-Scenarios", where Sheetname is the name that you specify in this dialog.
Data is always exported in columns (one column for the time, and one column for each result). If only a single realization A single model run within a Monte Carlo simulation. It represents one possible path the system could follow through time. is run, that realization is exported (for each result specified in the Result element).
If multiple realizations are run, by default the specified Custom Statistic for each result is exported. However, if you check For multi-realization Monte Carlo simulations export History Statistics instead of Custom Statistic, then multiple statistics (those displayed in Probability History displays, and defined in the Monte Carlo Result Options dialog) will be exported.
Note: If you need to export all realizations of a multiple realization simulation, you can do so by choosing to export to a text file rather than a spreadsheet.
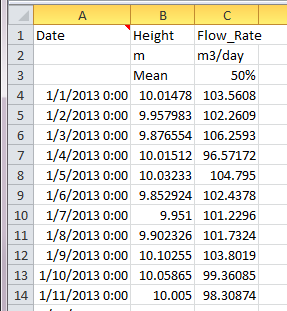
An example of what the exported data in a spreadsheet looks like is provided below:

In this particular example, the Result element contained two results (Height and Flow_Rate). The model was run for multiple realizations, and the default choice of exporting the Custom Statistic was selected (which in this case was Mean for Height and the 50th percentile for Flow_Rate).
Note that GoldSim writes three header rows. The first identifies the result, the second the units, and the third the result type (in this example, the Mean the 50th percentile). In addition, the first cell contains a comment with information regarding the run (e.g., version used, date/time of simulation and export, name of Result element, etc.).
Note: GoldSim exports the results as single-precision values. When exporting dates from a calendar time model, if the first cell of the time column is not formatted as a date, GoldSim will format the column as a localized date (based on Windows settings). None of other columns (i.e., the result values) will be formatted.
The time points that are exported to the spreadsheet are the same as those displayed in result charts and tables for the result element.
If your Result element is configured to display Reporting Periods Regular time points during a simulation (e.g., every month, every year) at which you can compute and view results associated with that period (e.g., monthly averages, annual cumulative values)., and you have more than one Reporting Period defined, you must specify which period you wish to export in the When using Reporting Periods drop-list. The type of Reporting Period results that are exported (e.g., Average, Cumulative, etc.) are as specified in the Properties dialog for the Result element.
If a result is an array A collection of variables that share common output attributes and can be manipulated in GoldSim elements or input expressions., it is simply treated in the spreadsheet as separate items (i.e., an array of 10 items would produce 10 result columns).
Several other points regarding result export to spreadsheets should be noted:
- Conditions are exported as 0 (False) or 1 (True).
- Results that are dates (such as the output of a Milestone element An event element that records the time that an event occurs.) are exported as Julian days.
- If an output is an array, only those items of the array which have been selected to be viewed (via the Array Label Set dialog) are exported.
- For simulations involving multiple realizations, only those realizations which have been specifically selected to be included (via the Monte Carlo Result Options dialog) are used to compute the Custom Statistic that is exported.
- High resolution results are not exported. That is, if your Time History Result is configured to include unscheduled updates Timesteps that are inserted automatically by GoldSim during a simulation and are not directly specified by the user prior to running the model., these are not exported. Only scheduled updates are exported.
- You cannot export time history results from a SubModel A specialized element that allows you embed one complete GoldSim model within another GoldSim model. This facilitates, among other things, probabilistic optimization, explicit separation of uncertainty from variability, and manipulation of Monte Carlo statistics. (i.e., if the Time Display Setting in the Result element is "SubModel Time").
- When exporting Reporting Period results, the type of result (e.g., Average, Plot Point, Period End, etc.) is included (in parentheses) after the Statistic that is being exported in the header for the data.
The actual export of the results can be triggered in two ways: manually and automatically. This is determined by the Export automatically when simulation completes checkbox. If this box is cleared, GoldSim only exports the data if and when you press the Export Now button in the Export tab of the Result element dialog. If this box is checked, however, GoldSim automatically exports the results at the end of the simulation. When it exports the results in this way, any errors it encounters (e.g., running out of space in the spreadsheet) are written to the Run Log Text that is stored with a GoldSim model once it has been run. It contains basic information regarding the simulation, and any warning or error messages that were generated..
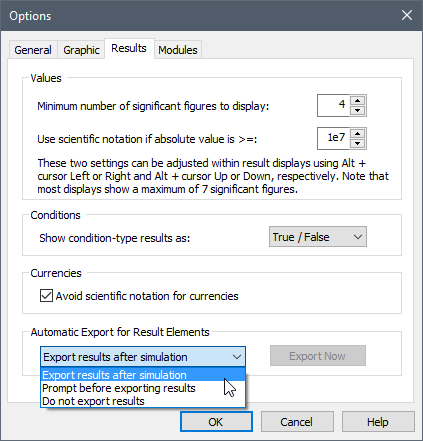
For elements which are set to export automatically, you can globally control their behavior from the Results tab of the Options dialog (accessed from the main menu via Model|Options..., and then selecting the Results tab):

The options in the drop-list affect all Time History Result elements which are set to export automatically when the simulation completes. If "Export results after simulation" is selected, any Result elements which are set to export results will export (silently) at the end of the simulation. If "Prompt before exporting results" is selected, at the end of the simulation, you will be prompted to determine whether or not to carry out an automatic export. If "Do not export results" is selected, no automatic export is carried out (i.e., this overrides the selection for each individual Result element).
Pressing the Export Now button manually exports results from all Time History Result elements.
Note: Within Dashboards, the Button control A special control that can be added to a Dashboard that provides a mechanism for linking a wide range of actions to a button. provides a command option that is equivalent to pressing the Export Now button from the Result tab of the Options dialog.
Several points should be noted regarding automatic export of spreadsheet results:
- Automatic export is ignored when carrying out a Sensitivity Analysis or an Optimization run.
- Automatic export is ignored if the Result element is inside a SubModel.
- Automatic export is only carried out under special circumstances when running and comparing scenarios.
Finally, when exporting to spreadsheets, the following points regarding the use of Excel should be noted:
- GoldSim supports .xlsx, .xlsm, and .xls Excel files. Note that GoldSim does not officially support versions of Excel prior to Excel 2010.
- The .xls format is limited to 65,536 rows and 256 columns. Exporting in columns allows a maximum of 65,533 plot points Points in time at which the value of outputs are saved for plotting time history data. to be exported (three rows are reserved for the header) and 255 output values (first column is reserved for time). If the data will not fit in the spreadsheet due to one of these limitations, a warning message will be written to the screen (if exporting manually) or the Run Log (if exporting automatically). Note, however, that Excel 2007 and later support an extended worksheet size (1,048,576 rows by 16,384 columns). If you wish to export data to an extended worksheet range into GoldSim, you must use Excel 2007 or newer, and the file format must be .xlsx or .xlsm.
- You should never try to open a spreadsheet that is linked to GoldSim while a simulation is running. In addition, prior to running a GoldSim model that is linked to a spreadsheet, all referenced spreadsheets should be closed. If you try to interact with a spreadsheet that is being used by GoldSim during a simulation, all interaction with the spreadsheet is blocked by GoldSim. However, under some circumstances this may not be possible and could lead to errors. Hence, as a general rule, you should not use Excel while a GoldSim model that references Excel is running.
- You should not specify Excel files with the same filename that are in different folders, drives or network locations. Excel is unable to open such files simultaneously, and this will cause GoldSim to fail.
Learn more
- Exporting Scenario Results from a Time History Result Element to a Spreadsheet
- Viewing Custom Statistics for Multiple Realizations
- Viewing Probability Histories for Multiple Realizations
- Exporting from a Time History Result Element to a Text File
- Specifying When Time History Results Will Be Saved
- Viewing Reporting Period-Based Results in Time History Result Elements
- Viewing Time Histories for Array Outputs
- Classifying and Screening Realizations
- Viewing Unscheduled Updates in Time History Result Elements
- Exporting Simulation Results
- Running Sensitivity Analyses
- Running an Optimization
- Using SubModels to Embed Models Within Models
- Exporting Final Value Results for Multiple Outputs and Multiple Realizations
- Exporting from a Time History Result Element to a Spreadsheet
- Exporting from a Time History Result Element to a Text File
- Exporting Results Using a Spreadsheet Element
- Exporting Results
- Exporting Scenario Results from a Time History Result Element to a Spreadsheet