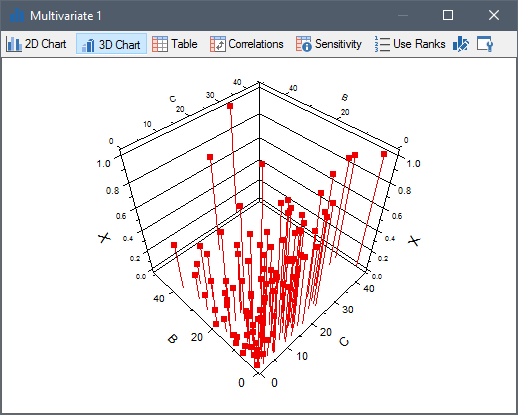
A 3D Scatter Plot (or a Cloud Plot) allows you to visualize the relationship between three variables.
The default view for a Multi-Variate result is a 2D Scatter Plot.
If you are viewing a 2D Scatter Plot (or a different type of Multi-Variate display), you can view a 3D Scatter Plot by pressing the 3D Chart button at the top of the display.
Note: Depending on how many variables you have defined in the Result properties dialog, the 3D Chart button may not be available. In particular, in order to display a 3D Scatter Plot, you must have at least three results defined.
Note: When viewing a Multi-Variate Result element A Result element that allows you to analyze and compare multiple outputs in graphical or tabular form (such as scatter plots, as well as carrying out sensitivity and correlation analysis among the selected outputs)., the element "remembers" the last type of view that was displayed, and displays that view when you double-click on it.
A 3D Scatter Plot looks like this:

For the purpose of creating scatter plots, the variables must be assigned to specific axes. The first output in the list of results in the Result Properties dialog is assigned to the Y-axis (i.e., the "Result" axis). The second output is assigned to the X1-axis, and the third output is assigned to the X2-axis. Additional variables are not assigned to any axis. This is indicated in the Result column of the Result Properties dialog. The order in which multiple results appear in the list can be changed using the Move Up and Move Down buttons in that dialog.
The Use Ranks button determines whether the display uses ranks of the values or the actual values. By default, this button is not pressed, and the display uses actual values.
You can rotate the three dimensional image by holding down the left mouse button and dragging within the chart. You can also use the Up, Down Left and Right cursor keys.
In addition, 3D Scatter Plots have several hot-keys which can be used to modify the plot:
| Keys | Action |
| Ctrl+D | Toggles the drop lines (the lines drawn from each point to the base of the axis) on and off. |
| Ctrl+S | Toggles between a 3D scatter plot and a 2D scatter plot. |
These options are also available from the context menu for the chart.
You can copy the chart to the clipboard by right-clicking in the chart, and selecting Copy from the context menu. Alternatively, you can press Ctrl+C while viewing the chart. To export a chart, right-click in the chart, and select Export... from the context menu.
By default, Multi-Variate results operate on Final Values. That is, the display uses the values at the end of each realization A single model run within a Monte Carlo simulation. It represents one possible path the system could follow through time.. However, by defining Capture Times User-defined points in time during a simulation at which “Final Value” results are captured for result display. The final time point in the simulation is always included as a Capture Time, but additional times can be added., you can display values at any specified time. If you have created Capture Times, an additional drop-list is added to the display window to allow you to select the set of data (i.e., the values at the specified Capture Time) that you would like to display.
If you are using Result Classification, the plots points will be displayed in a different color for each category that has been defined.
Learn more
- Controlling the Chart Style in Multi-Variate Results
- Selecting Outputs for a Multi-Variate Result Display
- Using Result Classification and Screening in Multi-Variate Results
- Viewing a 2D Scatter Plot
- Viewing a 3D Scatter Plot
- Viewing a Correlation Matrix Table
- Viewing a Raw Multi-Variate Data Table
- Viewing a Sensitivity Analysis Table
- Viewing the Properties of a Multi-Variate Result