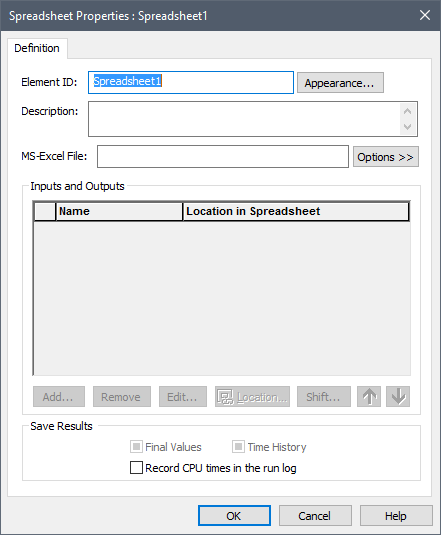
The properties dialog for a Spreadsheet element An element that can dynamically link to an Excel spreadsheet. looks like this:

You must first enter the name of a Microsoft Excel spreadsheet file to which you wish to link by pressing the Options >> button. This will provide options for either selecting an existing file, or creating (and then selecting) a new file.
Note: If you select a file in the same directory as (or a subdirectory below) your GoldSim .gsm file, GoldSim will subsequently display just a local path. If you select a file in a directory above your .gsm file, it will display the full path.
Once you have selected a file, you can subsequently use the Options >> button to select a different file. You can also use the Options>> button to open the selected file in Excel. (Note that multiple Spreadsheet elements can link to the same spreadsheet file.)
Spreadsheet elements can be used in one of three ways:
- You can use the spreadsheet as a database and import data from the spreadsheet into GoldSim at the beginning of the simulation.
- You can use the spreadsheet as a repository for results and export data from GoldSim to the spreadsheet throughout a simulation.
- You can use the spreadsheet as a function by exporting data into specified cells in the spreadsheet from GoldSim, having the spreadsheet recalculate, and then import data from "result" cells in the spreadsheet back into your GoldSim model.
In all cases, you need to define either at least one input to the spreadsheet element (data that you are exporting from GoldSim to the spreadsheet), or one output from the spreadsheet (data that you are importing from the spreadsheet into GoldSim).
The dialog lists all of the inputs and outputs that you have specified (inputs are listed in the table first).
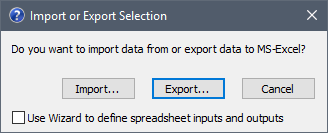
You add inputs and outputs by pressing the Add... button (which only becomes available after you have specified a spreadsheet file). After pressing the Add... button, the following dialog is displayed:

You must select whether you want to Import data from the spreadsheet (creating an output to the element) or Export data to the spreadsheet (creating an input for the element). If Use Wizard to define spreadsheet inputs and outputs is checked, a wizard will pop up to guide you through the process of creating an input or output. Otherwise, a dialog will appear. It is recommended that you use the wizard until you are familiar with the use of the Spreadsheet element.
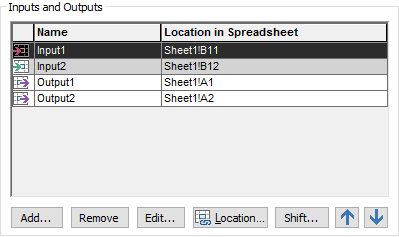
Once you have defined or edited an input or output, the main Spreadsheet element dialog is displayed again, listing all of the inputs and outputs that you have specified (inputs are listed in the table first):

An input or output can be edited by either selecting the row and pressing Edit..., or by double-clicking on the row. You can edit the spreadsheet location of any entry by selecting the row and pressing Location.... An input or output can be deleted by pressing the Remove button.
The up and down arrow buttons move the entries up and down the list (although inputs will always be listed before outputs). Note that the relative positions of the rows have no effect on how the element functions, and such repositioning is purely cosmetic.
The Shift... button provides access to a dialog that allows you to quickly edit the spreadsheet location of one or more inputs or outputs by shifting them by one or more sheets, rows or columns.
If you check the Record CPU times in the run log box, if the element uses more than 1 CPU seconds, a message will be written to the GoldSim run log Text that is stored with a GoldSim model once it has been run. It contains basic information regarding the simulation, and any warning or error messages that were generated. identifying the element's name, type (i.e., Spreadsheet), the number of times it was updated, and the total CPU time used.
Learn more
- Controlling When GoldSim Exchanges Data with the Spreadsheet File
- Defining Offsets for Inputs and Outputs to a Spreadsheet Element
- Defining the Properties of a Spreadsheet Element
- Exchanging Date Information with a Spreadsheet
- How Spreadsheet Files are Affected By GoldSim
- Importing Stochastic Element Definitions from a Spreadsheet
- Locking onto a Spreadsheet File
- Saving Spreadsheet Element Outputs
- Shifting Ranges for Inputs and Outputs to a Spreadsheet Element
- Spreadsheet Element Inputs - Exporting Data to the Spreadsheet
- Spreadsheet Element Outputs - Importing Data from the Spreadsheet
- Using the Spreadsheet Wizard to Define Spreadsheet Inputs
- Using the Spreadsheet Wizard to Define Spreadsheet Outputs
- Viewing a Spreadsheet Element in the Browser