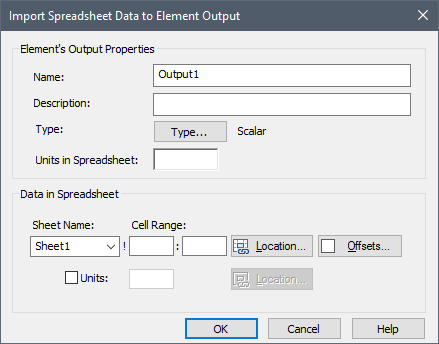
If you press the Import... button from the Import or Export Selection dialog (and the checkbox for using the wizard is cleared), or if you select an existing output in the main Spreadsheet dialog and press the Edit... button, the following dialog is displayed:

This dialog is used to create an output to the Spreadsheet element An element that can dynamically link to an Excel spreadsheet.. An output to a Spreadsheet element is defined by specifying a cell range in the spreadsheet file that you wish to import from the spreadsheet into GoldSim, making the data accessible within GoldSim as an element output.
You define an output as follows:
- The Name of the output will default to Outputn, where n is an integer. You will use this name to reference the output within GoldSim (as SpreadsheetElementName.OutputName). Hence, you will likely want to change this name from its default. The optional Description appears only in this dialog and is useful for helping to document your spreadsheet link.
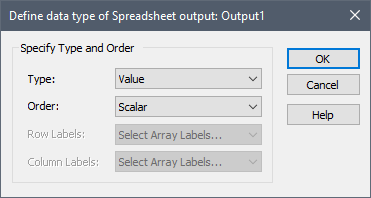
- Press the Type...
button to define the attributes of the output. The following dialog will
be displayed:

This dialog allows you to define the Order (scalar An output consisting of a single value or condition., vector A one-dimensional array., matrix A two-dimensional array.) of the output. You can also define the Type. By default, the Type is a Value (conditions are not supported and cannot be selected here). However, you can also select Probability Distribution A mathematical representation of the relative likelihood of a variable having certain specific values. It can be expressed as a PDF (or a PMF for discrete variables), CDF or CCDF., which allows you to import a series of input fields that define a distribution. - You must then specify the units of the date being imported from the spreadsheet. There are two ways to do this. You can simply specify in this dialog what the units are (and this is the default). In this case, the Units in Spreadsheet represents the units of the data in the spreadsheet. This will also become the display units The units (e.g., m, g, $/day) in which an output is displayed within GoldSim. for the output after it is imported into GoldSim. As discussed below, alternatively, you can also import the unit string directly from the spreadsheet.
- You must then select the location in the spreadsheet from which you wish to import the data. You can do this by specifying the Sheet Name and Cell Range directly. Alternatively, you can press the Location... button, which opens the spreadsheet and provides a dialog allowing you to directly select the desired Cell Range using your mouse.
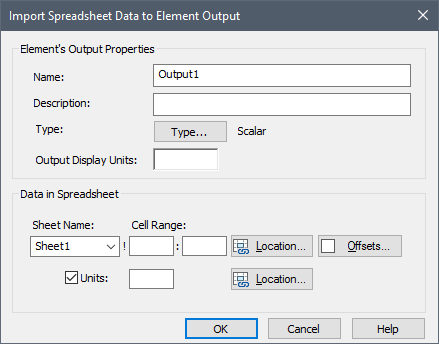
- You can optionally choose
to import the units for the data directly from the spreadsheet (rather than
specifying the units directly as in step 3 above). In this case, select
the Units checkbox in the dialog:

You must then specify the Cell containing the unit directly to the right of the Units checkbox (or alternatively, you can press the Location... button, which opens the spreadsheet and provides a dialog allowing you to directly select the desired Cell using your mouse). Note that when you check this box, the field directly below the Type button changes from Units in Spreadsheet to Output Display Units. This allows the output to have different display units than the units in the spreadsheet (although, of course, they must be of the same dimension).
Note: The size of the range specified in the spreadsheet must be consistent with Order (scalar, vector, matrix) that you defined for the output. Hence, a scalar output must map to a single cell; a vector output must map to a single column or row range with the number of rows or columns matching the number of items in the vector; and a matrix output must map to a rectangular range with the number of rows and columns matching the dimensions An output attribute for an element that defines the dimensionality (in terms of Length, Time and other fundamental dimensions) of the output. of the matrix (e.g., a matrix with 3 rows and 6 columns would have to map to a range in the spreadsheet 3 rows long and 6 columns wide). When importing a Probability Distribution, the range is a single cell (the first cell in the string of inputs defining the distribution)
Note: Spreadsheets cells can be defined as TRUE or FALSE. If you try to import such a cell into GoldSim, a TRUE cell will be imported as the number 1, and a FALSE cell will be imported as 0.
If required, you can control the sheet and cell range from which GoldSim imports data dynamically. For example, you could instruct GoldSim to change the location from which it imports data based on the simulation time or the realization A single model run within a Monte Carlo simulation. It represents one possible path the system could follow through time..
If you would like to edit the location of several inputs (or outputs) simultaneously by shifting them by sheet, row or column, you can do this from the main Spreadsheet element dialog using the Shift... button.
Note: Prior to running the model, you can view any spreadsheet data that you plan to import by first selecting the Update Spreadsheet Outputs item in the menu displayed via the Options>> button for the Spreadsheet element, and then viewing the outputs of the element in tool-tips within the element's output port.
Note: If GoldSim cannot find the spreadsheet when you try to run the model, the model will still run and GoldSim will log a warning message to the Run Log Text that is stored with a GoldSim model once it has been run. It contains basic information regarding the simulation, and any warning or error messages that were generated.. If data from the spreadsheet was previously imported (i.e., it had been run previously with the spreadsheet accessible), it will use the data that was imported previously. If data from the spreadsheet was never imported (i.e., it had never been run previously with the spreadsheet accessible), all values will default to 0.
Learn more
- Controlling When GoldSim Exchanges Data with the Spreadsheet File
- Defining Offsets for Inputs and Outputs to a Spreadsheet Element
- Defining the Properties of a Spreadsheet Element
- Exchanging Date Information with a Spreadsheet
- How Spreadsheet Files are Affected By GoldSim
- Importing Stochastic Element Definitions from a Spreadsheet
- Locking onto a Spreadsheet File
- Saving Spreadsheet Element Outputs
- Shifting Ranges for Inputs and Outputs to a Spreadsheet Element
- Spreadsheet Element Inputs - Exporting Data to the Spreadsheet
- Spreadsheet Element Outputs - Importing Data from the Spreadsheet
- Using the Spreadsheet Wizard to Define Spreadsheet Inputs
- Using the Spreadsheet Wizard to Define Spreadsheet Outputs
- Viewing a Spreadsheet Element in the Browser