Let's start by inserting a new Fund element into the new model. We will use this element to simulate a bank account.
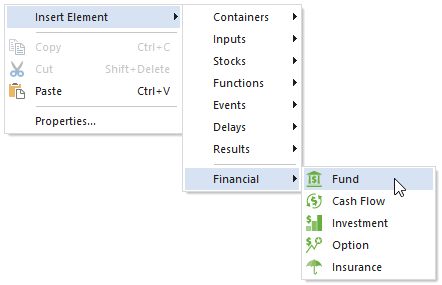
We can do this by right-clicking in the graphics pane The primary portion of the GoldSim interface, where the graphical depiction of the model is shown., and selecting Insert Element|Financial|Fund Element from the context menu:

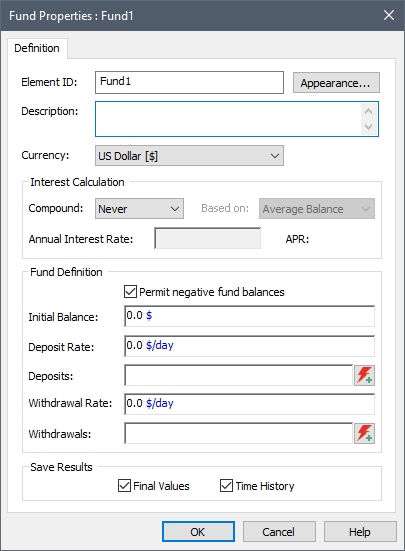
This will insert the element and open the Fund element's property dialog:

If this is your first close look at a financial element, you will notice that it has some common features with the other basic GoldSim elements that you've seen in the GoldSim Tutorial. The Element ID and Description fields are identical (and the same naming rules apply to reliability elements as to normal GoldSim elements). The Appearance button and Save Results checkboxes are also common to all GoldSim elements.
Let's name this element "Bank_Account" and give it a simple description:

Below the Description field, you specify the Currency units you wish to use. GoldSim will list all of the currencies that are in its database (by default, this is dollars, euros, pounds sterling and yen, and you can easily add any additional currencies by selecting Model|Currencies from the main menu). For now, we will choose dollars.
It is then necessary to specify how interest is calculated. In this example, let's assume a 5% annual interest rate, compounded continuously:

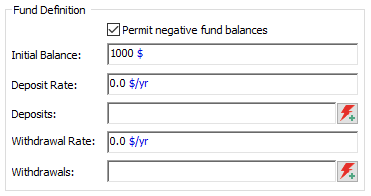
The bottom part of the dialog allows you to specify an Initial Balance, as well as deposits and withdrawals. For now, let's just specify an Initial Balance of 1000$. We will add some deposits and withdrawals in subsequent steps:

Note: In GoldSim, units are added after the value, not before. So in this case, entering $1000 would be incorrect. Instead, we enter "1000 $".
After entering the Initial Balance, you can press OK to close the dialog.
Learn more
- Step 1: Setting Up a Dynamic Financial Model
- Step 2: Adding a Fund Element to Simulate a Bank Account
- Step 3: Running the Model and Viewing a Simple Result
- Step 4: Adding Discrete Deposits to the Account
- Step 5: Running the Model with Deposits
- Step 6: Removing Discrete Withdrawals from the Account
- Step 7: Running the Model with Deposits and Withdrawals
- Step 8: Running Multiple Realizations of a Financial Model
- Where Do I Go From Here?