There are two types of results that you can save for an element: Time Histories or Final Values. Final Value type results allow you to display distributions, multi-variate results (e.g., scatter plots), bar charts, pie charts and array A collection of variables that share common output attributes and can be manipulated in GoldSim elements or input expressions. plots at specific points in time.
By default, "Final Value" type results are only available
at the final time point in the simulation. In some cases, however, you may
also want to capture these results at other times in the simulation. This
can be useful, for example, if you wanted to view a result distribution for an
output at various times during a simulation. GoldSim facilitates this by
allowing you to create
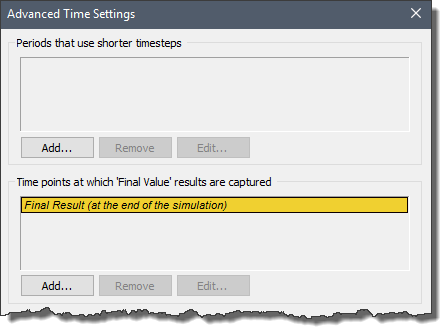
Capture Times are defined toward the top of the Advanced Time Settings page (accessed via the Advanced... button on the Time tab of the Simulation Settings dialog):

Note that there is always a Capture Time at the end of the simulation (that cannot be deleted). You can add a new Capture Time by pressing the Add... button. When you do so, a dialog for specifying the Capture Time will be displayed. The dialog differs based on whether the Time Basis is Elapsed Time or Calendar time.
If you are carrying out an Elapsed Time simulation A simulation that tracks time using the elapsed time., the dialog looks like this:

The elapsed Capture Time should be within the specified simulation duration, and can be defined using any time unit. This can be specified as a number or an equation (but you cannot link to an element).
If you are carrying out a Calendar Time simulation, the dialog looks like this:

The Capture Time is specified as a date/time, and should be within the specified simulation period.
When creating a Capture Time, you must provide it with an ID (which can be up to 20 characters long). This ID is used as a label when accessing Capture Time results in various result displays.
Once you have added a Capture Time, you can edit it by pressing the Edit button, or delete it by pressing the Remove button.
When you define a Capture Time, a scheduled timestep A discrete interval of time used in dynamic simulations. is added at that time (if one does not already exist).
Note: If you press the Show Scheduled Updates... button at the top of the Time tab, all of the scheduled timesteps Timesteps that are directly specified by the user prior to running the model. in the model will be displayed. Because Capture Times add scheduled timesteps, you can use this to see exactly where they will be added. Note, however, that although Capture Times are scheduled timesteps, they are not included in time history results.
A simple example file illustrating Capture Times (CaptureTimes.gsm) can be found in the Running subfolder of the General Examples folder in your GoldSim directory (accessed by selecting File | Open Example... from the main menu).
Learn more
- Adding Shorter Timesteps Over Defined Periods
- Controlling Unscheduled Updates
- Controlling When Weeks and Years Start
- Creating Capture Times for Results
- Defining Reporting Periods
- Defining the Time Basis and Simulation Duration
- Dynamically Controlling the Timestep
- Setting the Basic Time Options
- Specifying Containers with Internal Clocks
- Specifying the Basic Step Length and Alignment
- Specifying When Time History Results Will Be Saved
- Understanding Timestepping in GoldSim