Because a SubModel A specialized element that allows you embed one complete GoldSim model within another GoldSim model. This facilitates, among other things, probabilistic optimization, explicit separation of uncertainty from variability, and manipulation of Monte Carlo statistics. is a self-contained system (i.e., a separate model), elements inside a SubModel cannot "see" anything on the outside (i.e., in the outer model). As a result, you cannot reference outputs that exist outside of the SubModel in the same way you would from inside a Container An element that acts like a "box" or a "folder" into which other elements can be placed. It can be used to create hierarchical models.. (In fact, within a SubModel, the Insert Link dialog accessed via the context menu for input fields does not list any elements outside of the SubModel).
Of course, in order to be of any value, a SubModel must have some way to communicate with (e.g., access outputs of) the outer model. This is done by creating an interface between the SubModel and the outer model.
The interface is accessed via the Interface tab on the SubModel dialog:
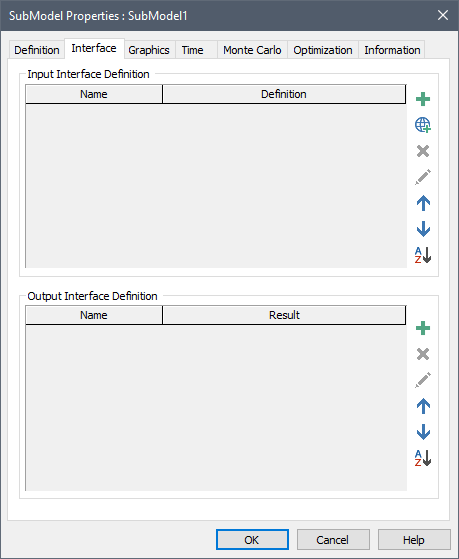
The top part of this dialog is used to define the input interface. The bottom portion is used to define the output interface.
In order to access an output outside of the SubModel, you must add the output to the input interface. This is done by pressing the Add button in the Input Interface portion of the dialog:

When you do this, GoldSim displays the Insert Link dialog, allowing you to select an output outside of the SubModel to add to the interface).
After selecting an output, the following dialog is displayed:
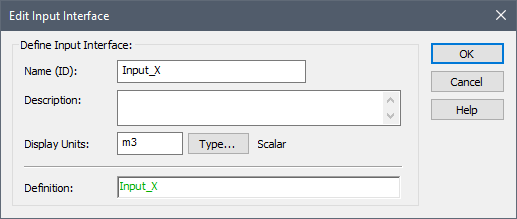
The Name (ID) is the name by which the output variable can be referenced inside the SubModel. This has the same restrictions as an element ID. The Description is an optional description of the variable.
You must then specify the Display Units and Type information (e.g., value/condition, scalar An output consisting of a single value or condition./vector A one-dimensional array./matrix A two-dimensional array.) for the variable. Finally, you specify the Definition for the input. Typically, this will be a link to an output in the outer model that you selected. However, it can also be an equation (with links), or a constant value.
Note: If you select a link (rather than pressing Cancel) when adding the interface input, the Definition, Display Units The units (e.g., m, g, $/day) in which an output is displayed within GoldSim. and Type will automatically be entered.
In addition to Values and Conditions, three types of complex outputs can be specified as inputs to a SubModel Input interface: Time Series Definitions, Lookup Table definitions, and Distribution definitions. These are specified via the Type button. In the two former cases, additional information (e.g., what the Time Series represents, units for the independent variables for a Lookup Table) must also be specified in the input interface dialog.
A Time Series definition can be produced by a Time Series element, an External element or another SubModel. A Lookup Table definition can be produced by an External element. A Distribution definition is one of the outputs of a Stochastic element An element that can be used to quantitatively represent the uncertainty in a model input. (and can also be produced by another SubModel). Passing these definitions through the input interface allows you to pass complete time series, lookup table and distribution definitions into the SubModel, where they can be used to define Time Series, Lookup Table or Stochastic elements.
Once you have added an output from the outer model to the Input Interface of a SubModel, you can subsequently reference the output within the SubModel by using the specified Name that you defined previously, preceded by a ~. For example, if you create an interface input called X, you could reference it in input fields within the SubModel as ~X.
You can also use the Insert Link option to reference an item on the Input Interface by right-clicking in an input field within the SubModel. When you do so, all of the items on the Input Interface to the SubModel will be displayed within the "Available Properties" folder:
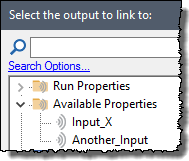
Note: In this case, the ~ indicates that this output has some special characteristics (in particular, it is coming from outside of the SubModel). This is an instance of what is referred to as a locally available property in GoldSim. Locally available properties are accessed by using a ~.
In some cases, you may want to control some of the simulation settings (i.e., time and Monte Carlo options) of the SubModel from outside of the SubModel (e.g., using values provided by the outer model). To facilitate this, GoldSim allows you to add run properties A set of fundamental properties that track the progress of the simulation (e.g., Time, Realization) and can be referenced like outputs in expressions. to the input interface.
This is done by pressing the Add Run Property button in the Input Interface portion of the dialog:

When you do this, the following dialog is displayed:
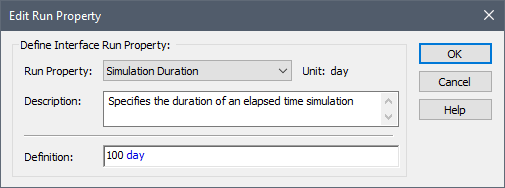
The Run Property field provides a drop-list of options for the SubModel simulation setting that you wish to control. The options are:
- Simulation Duration;
- Maximum time between updates;
- Number of Realizations; and
- Realization A single model run within a Monte Carlo simulation. It represents one possible path the system could follow through time. to Run
The Definition field determines the value that will be used for the selected simulation setting input. Typically, this will be a link to an output in the outer model (the Definition field's context menu can be used to access an Insert Link dialog that lists all elements in the outer model). However, it can also be an equation (with links), or a constant value.
Note: If you wish to control the Number of Realizations Run Property, the value must always be set to a number greater than 1. That is, you cannot switch between a single realization run and a multi-realization run of the SubModel dynamically via the Input Interface.
Note that when you select one of these options, the appropriate input fields are automatically locked (and cannot be edited) in the Time and Monte Carlo tabs for the SubModel:
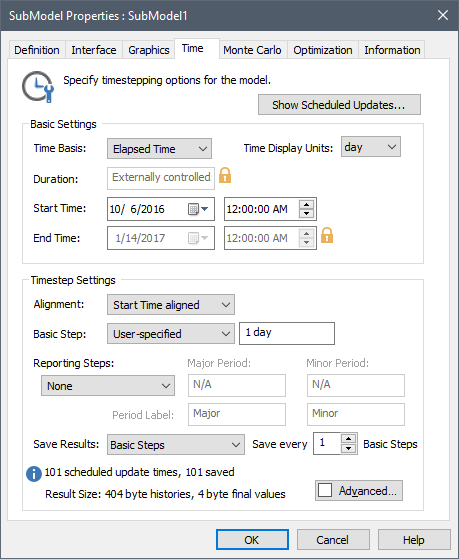
Note: Buttons for deleting, editing, moving and alphabetically sorting the inputs on the interface are available directly below the Add and Add Run Property buttons.
Learn more
- Building the Contents of the SubModel
- Carrying Out Nested Monte Carlo Simulation Using a SubModel
- Controlling How Run Messages are Logged for a SubModel
- Controlling the Appearance of the Graphics Pane for a SubModel
- Controlling When a SubModel is to be Run
- Creating the Input Interface to a SubModel
- Creating the Output Interface to a SubModel
- Exporting SubModels
- Importing SubModels
- Interrupting and Pausing a Simulation Within a SubModel
- Protecting the Contents of a SubModel
- Running an Optimization Within a SubModel
- Saving and Viewing Results Inside a SubModel
- Specifying the Modules and Module Options for a SubModel
- Specifying the Simulation Settings for a SubModel
- Specifying the Solution Type for a SubModel
- Using Resources Inside a SubModel
- Viewing and Editing SubModel Summary Information
- Viewing Element Dependencies Within a SubModel