You can create a simple XML file that can be viewed in a text editor, browser An alternative view of a GoldSim model, in which elements are displayed in a tree, and organized either hierarchically, or by type. or XML editor that echoes out all of the elements in a GoldSim model. This file contains the name, type, description and path for each element, and specifically illustrates the model hierarchy. With one exception, however, the file does not include the definition (e.g., input values, units) for any elements (it does include this information for all Data elements in the model).
You can create this file by selecting File | Save Inventory... from the main menu.
XML stands for eXtensible Markup Language. It was designed as a software and hardware independent tool to store and transport data such that it is both human- and machine-readable. Like HTML, XML uses tags. However, unlike HTML, XML does not have predefined tags. Rather, the author defines custom tags (as well as the document structure).
The general concept behind XML is to create a tree structure which starts at a root object and branches to child object. Such a structure, of course, is ideal for displaying the hierarchical design of a GoldSim model.
Objects that contain other tags as "contents" (such as Containers in GoldSim) are identified and formed by using opening and closing tags. The closing tag is identical to the opening tab with a forward slash (e.g., <Global>, </Global>).
The tags used by GoldSim are as follows:
| Tag | Description |
| <GSM> | Opening and closing tags for entire file. |
| <Global> | Demarcates global information regarding file. <File>, <Author>, <Created> and <Modified> tags are always inside <Global> opening and closing tags. |
| <File> | GoldSim filename and path. |
| <Author> | Model Author. |
| <Created> | Date and time GoldSim file was created. |
| <Modified> | Date and time GoldSim file was last modified. |
| <Model> | Demarcates information defining the model itself. <Container An element that acts like a "box" or a "folder" into which other elements can be placed. It can be used to create hierarchical models.>, <Elements>, and <Element> tags are always inside <Model> opening and closing tags. |
| <Container> | A GoldSim Container. This tag also includes a number of properties (e.g., the Container name). |
| <Elements> | Demarcates a list of elements inside a GoldSim Container. |
| <Element> | A GoldSim element. This tag also includes a number of properties (e.g., the element name). |
As pointed out above, with one exception, the file does not include the definition (e.g., input values, units) for any elements. It does, however, include this information for Data elements. To facilitate this, several additional tags are only used to describe Data elements (these are nested inside the <Element> tag):
| Tag | Description |
| <Input> | An input field. This tag also includes a number of properties (e.g., the input name, the type - Value or Condition, and the units). |
| <Equation> | The expression entered into the input field. |
| <Row> | For arrays, the row of the array A collection of variables that share common output attributes and can be manipulated in GoldSim elements or input expressions.. This tag also includes a property (id) identifying the row item ID |
| <Column> | For 2-D arrays (matrices), the column of the array. This tag also includes a property (id) identifying the column item ID |
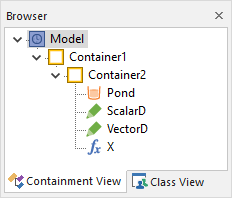
The best way to illustrate this is to examine a very simple model file. Consider the following simple model (as illustrated in the browser):

In this model, Container1 contains Container2, which contains a Reservoir A stock element that integrates and conserves flows of materials. named Pond, an Expression named X, a scalar An output consisting of a single value or condition. Data element An input element intended to represent constant inputs in a model. named ScalarD, and a vector A one-dimensional array. Data element named VectorD (this element uses an Array Label Set named "Region" that has three items: East, North and South).
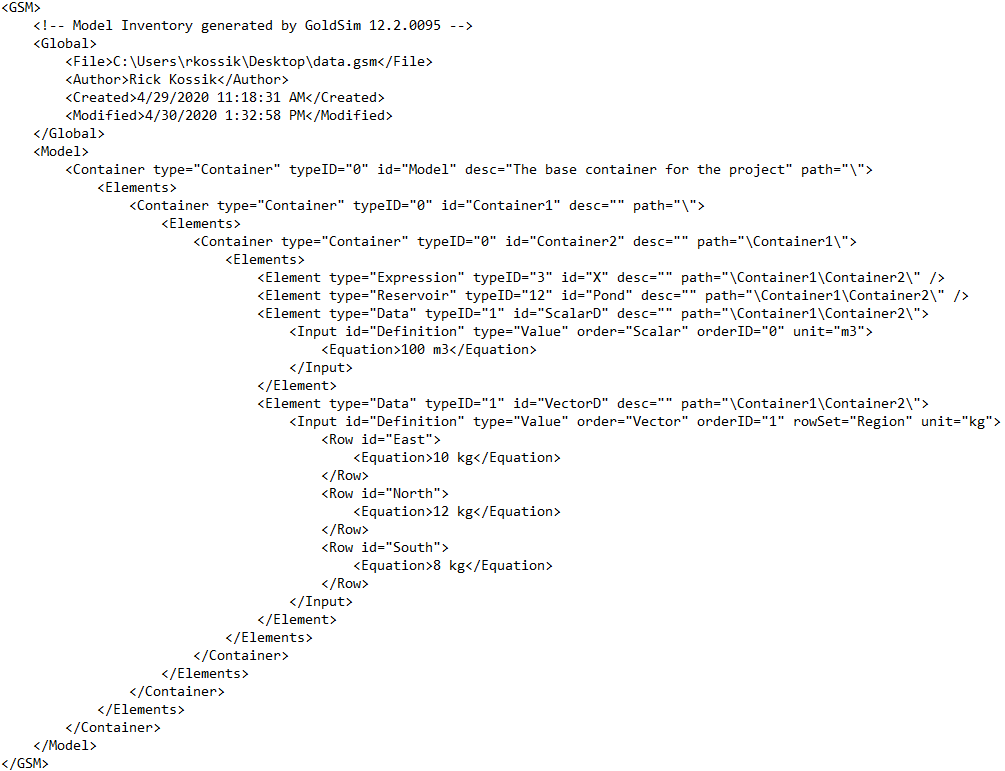
XML files can be viewed in any text editor. The "raw" XML Model Inventory file for the model above as viewed as text looks like this:

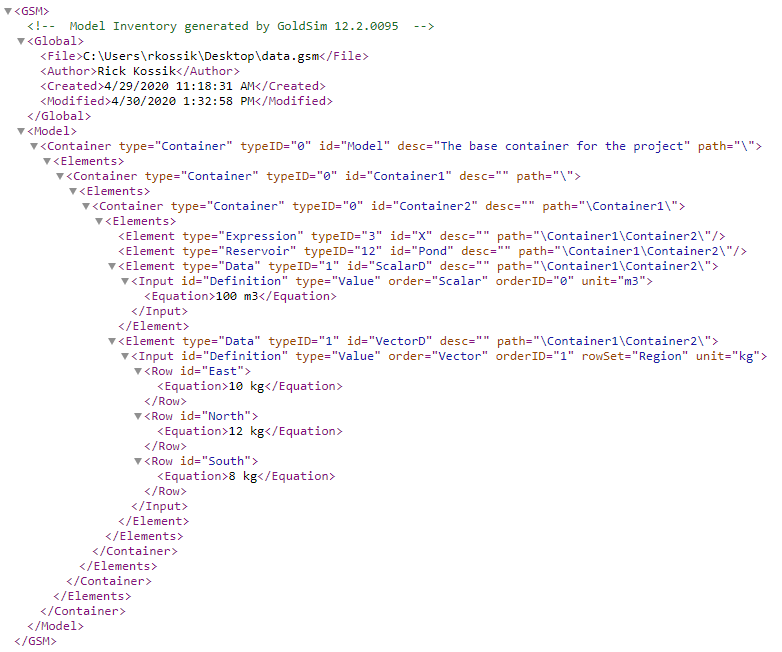
The XML Model Inventory file can be viewed in most browsers, and by default will look similar to this (this is viewed using Chrome):

Note that when viewing an XML file in a browser, you can expand and collapse branches of the tree. In Chrome, this is done using the arrowheads at each branch. In the example above, all the branches are expanded.
As can be seen, the file structure is quite simple. The following should be noted:
- The <Elements> </Elements> tags surround all the elements inside a particular Container.
- Every element is
described using a tag that has the following format:
- <Element type="element type" typeID="element type number" id="element name" desc="element description" path="element path"/>.
- If the element is the Container, a <Container> tag is used (with the same format as the <Element> tag).
- In addition to the type of element being specified by name, it is also specified by a defined typeID. The typeID is an integer; typeIDs for all elements are listed below:
| TypeID | Element | TypeID | Element | TypeID | Element |
| 0 | Container | 25 | File | 200 | Pipe Pathway |
| 1 | Data | 26 | Dashboard | 201 | Cell Pathway |
| 2 | Integrator | 27 | Milestone | 202 | Species |
| 3 | Expression | 28 | Status | 203 | Receptor |
| 7 | Stochastic | 29 | Not | 204 | Source |
| 8 | Event Delay | 30 | Material Delay | 205 | Reference Fluid |
| 9 | Decision | 31 | Information Delay | 206 | Fluid |
| 11 | Selector | 32 | Discrete Change Delay | 207 | Solid |
| 12 | Reservoir | 33 | Triggered Event | 208 | External Pathway |
| 13 | Time History Result | 36 | Convolution | 209 | Network Pathway |
| 14 | External | 37 | Lookup Table | 210 | Fracture Set |
| 15 | Timed Event | 38 | Previous Value | 211 | CellNet Generator |
| 16 | Discrete Change | 39 | Random Choice | 212 | Aquifer Pathway |
| 17 | Array Result | 40 | SubModel | 340 | Function (RL) |
| 18 | Mult-Variate Result | 41 | History Generator | 341 | Action (RL) |
| 19 | Distribution Result | 42 | Splitter | 380 | Insurance |
| 20 | Spreadsheet | 43 | Allocator | 381 | Fund |
| 21 | And | 44 | Interrupt | 382 | Cash Flow |
| 22 | Or | 45 | Time Series | 383 | Investment |
| 23 | Sum | 46 | Script | 384 | Option |
| 24 | Extrema | 48 | Pool |
Data elements provide more details than the other elements. In particular, every Data element has an <Input> tag that is nested inside the <Element> tag that has the following format:
- <Input
id="Definition" type="input type" order="order"
orderID="ordernum" unit="units"> in which:
- input type is either Value or Condition
- order is either Scalar, Vector or Matrix A two-dimensional array.
- ordernum is either 0, 1 or 2 (0 for scalar, 1 for vector and 2 for matrix)
- unit is the actual display units The units (e.g., m, g, $/day) in which an output is displayed within GoldSim.
- Vector Data elements have one additional property (rowSet) and Matrix Data elements have two additional properties (rowSet and columnSet). The rowSet property is the name of the Array Label Set for the rows. The columnSet property is the name of the Array Label Set for the columns
- Every scalar Data element has an <Equation> tag nested inside the <Input> tag containing the expression entered in the input field.
- Every vector Data element has multiple <Row id="RowLabel" > tags (one for each row item, where RowLabel is the label for that row) that are nested inside the <Input> tag. Every <Row> tag has an <Equation> tag nested inside it containing the expression entered in the input field for that row.
- Every matrix Data element has multiple <Column id="ColumnLabel" > tags (one for each column item, where ColumnLabel is the label for that column) that are nested inside the <Input> tag. Every <Column> tag has multiple <Row> tags nested inside it (containing the row items for that column). Every <Row> tag has an <Equation> tag nested inside it containing the expression entered in the input field for that row in that column.
There are many online tools available for viewing XML files with default formatting. If you want to customize the formatting of your XML file (to make it more readable), follow the steps outlined in this article within the Help Center: https://support.goldsim.com/hc/en-us/articles/360001007328-Stylesheets-for-XML-Model-Inventory-File.