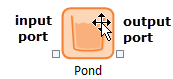
Most GoldSim elements have both input and output ports. (A small number of elements have only one or neither.)
Holding your cursor over an element will cause the ports to be displayed. The ports appear as small squares at the bottom corners of the element:
Ports serve two important purposes:
1. By left-clicking on them, you can view a list of the inputs and outputs for the element:
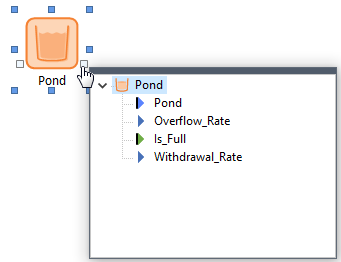
There are several reasons to do this, with the most common one being viewing the list of outputs in order to display results for a particular output.
2. By changing their appearance, ports are used to convey status information regarding the element and provide important visual cues when navigating a model. In particular,
•When in Result Mode, if an element has results, the output port becomes green:

•If an input or output of the element is linked to an element in another Container, a dot appears in the middle of the input and/or output port:
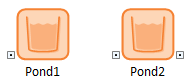
Pond1 has an input that comes from another Container. Pond2 has an input that comes from another Container and has an output that is used in another Container.
 Note: There is a third
instance in which the ports change their appearance. In particular, if an
element has a manually “forced” precedence to
address an ambiguous causality sequence, the input port becomes gold. This, however,
is a highly advanced feature and would rarely be encountered.
Note: There is a third
instance in which the ports change their appearance. In particular, if an
element has a manually “forced” precedence to
address an ambiguous causality sequence, the input port becomes gold. This, however,
is a highly advanced feature and would rarely be encountered.
The ports for an element are always displayed when you hold your cursor over it. However, you can control how ports are displayed when the cursor is not being held over an element. This is controlled via the main menu by selecting View | Show Element Ports:
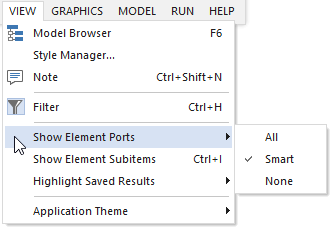
As can be seen, there are three options:
•Smart. This is the default. If this is selected, ports are only shown if they have some status information to display (e.g., results, links to other Containers). In the examples shown above, this is why only one of the two ports are shown in some cases.
•All. The ports are always shown.
•None. None of the ports are shown.
In the overwhelming majority of cases, the default (Smart) is the appropriate option. Occasionally, you may want the hide all ports (None) so as to make the graphics pane look less complicated. It is rare that you would want to show All.
Note: Changes to the
appearance of the ports are not saved with the file. Every time you
reopen the file, the appearance returns to the default (Smart).
Learn more about:
Using Output Ports to View Results