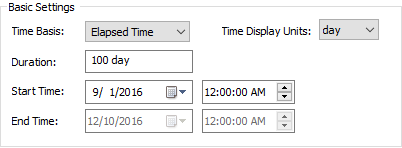
The top portion of the Time tab of the Simulation Settings dialog is used to specify the time basis for the simulation, as well as the simulation duration:
There are three ways in which you can represent time in GoldSim (controlled by Time Basis drop list):
•Elapsed Time
•Calendar Time
•Static Model
In an Elapsed Time simulation (the default), you must specify a simulation Duration. The Duration must be entered as a number (it cannot be defined as a link from an element), followed by a valid time unit. The simulation is then tracked in terms of elapsed time (e.g., when plotting time history results, the X-axis is plotted as elapsed time).
 Note: When specifying the
Duration, the unit “mon” should generally be avoided and the unit “yr”
should only be used for long-term Elapsed Time simulations. This is because
these units represent an average month (30.4375 days) and an average year
(365.25 days). As such, their use could be confusing to someone viewing your
model, unless it is very clear that you are referring to average months or
years.
Note: When specifying the
Duration, the unit “mon” should generally be avoided and the unit “yr”
should only be used for long-term Elapsed Time simulations. This is because
these units represent an average month (30.4375 days) and an average year
(365.25 days). As such, their use could be confusing to someone viewing your
model, unless it is very clear that you are referring to average months or
years.
In a Calendar Time simulation (also referred to as a date-time simulation), you enter a Start Time and an End Time, and the simulation is then tracked in terms of the calendar time (e.g., when plotting time history results, the X-axis is plotted as dates/times).
If you select a Calendar Time simulation, you can click on the arrow in the box to view a calendar to assist you in selecting a start or end date:
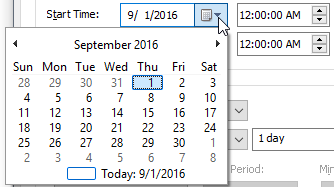
You can select part of the date (month, day, year) in the input field and then enter a value or use the arrow keys to increment or decrement the value. Arrow buttons on the calendar move forward or backward one calendar month. Clicking the month on the calendar activates a menu with the twelve months. Clicking the year on the calendar activates a control for changing the year.
Note: GoldSim supports a date
range from 1 January 1700 to 31 December 9999.
Note: The
format in which the dates are displayed is determined by the Windows settings
for your machine. To change these settings (e.g., to display dates in European
format with the day before the month), go to Control Panel and edit the Regional
Options.
Note: When running a Calendar
Time simulation, you can also specify the Duration. When you do so,
GoldSim will use the specified Start Time, and automatically update the
End Time accordingly.
Whether you are running an Elapsed Time simulation, or a Calendar Time simulation, by referencing GoldSim’s built-in Run Properties, you can reference calendar-based information in your models (e.g., what day of the week is it? What month is it?). This is possible in Elapsed Time simulations also since you can specify the Start Time for them.
Note: Specifying the Start
Time for Elapsed Time simulations also allows you to enter time series data
in terms of either elapsed time or calendar time; GoldSim uses the Start Time to
convert between the two formats.
The third option for carrying out your simulation is to run a Static Model. In a Static Model, the model does not step through time. This can be useful if you simply wish to carry out a static calculation using Monte Carlo simulation. A Static Model effectively sets the Duration to zero.
The Time Display Units provide the default time unit that is used in several parts of GoldSim. For example, for an Elapsed Time simulation, these are the units in which results (e.g., time history plots) will be displayed for all elements. Another example of where the default time unit is used is the Reservoir element. In this element, you specify a Display Unit, but several input fields require a rate. The default units for the rate are determined by the Time Display Units.
Example files which illustrate Elapsed and Calendar Time simulations (Elapsed.gsm and Calendar.gsm) can be found in the General Examples/ Running folder in your GoldSim directory (accessed by selecting File | Open Example... from the main menu).
Learn more about:
Next: Understanding Timestepping in GoldSim
Understanding and Referencing Run Properties