You specify the data in a 3-D Lookup Table element A type of input element that allows you to define your input in terms of a lookup table (i.e., a response surface). manually by pressing the Edit Data... button, which will display a dialog for defining the data in the table.
A 3-D table can be thought of as a 2-D table with multiple layers or slices. The Layer Variable defines the layer or “slice” of the look-up table, the Row Variable defines the rows, and the Column variable defines the columns.
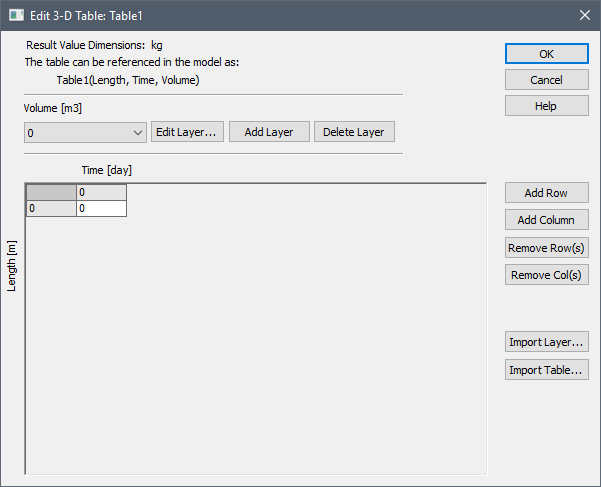
The following dialog will be displayed:

By default, the table is created with a single column, a single row and a single layer, and all the data values set to zero.
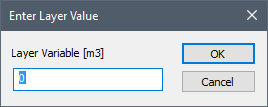
Within this dialog, you view one 2-D layer or slice of the table at a time. Each 2-D layer is associated with a particular value of the Layer Variable. When you first create a 3-D Table, there is by default, a single layer (a single value for the Layer Variable), and it is equal to 0. You can edit the value for a Layer Variable by pressing the Edit Layer... button, which will display the following dialog:

You can only enter a number into this field and should not append units. The assumed units for the values that you enter are the units specified for the Layer Variables on the main Lookup Table dialog. These units are displayed just above the Layer Variable edit field.
You can add additional layers by pressing the Add Layer button (which will display the same dialog as shown above). The Delete Layer button deletes the current layer. You can edit the value of an existing layer variable by pressing the Edit Layer... button.
You add rows and columns to the table using the Add Row(s) and Add Column(s) buttons. If you hold down the Ctrl key when you press these buttons, you will be prompted for the number of rows or columns to add (otherwise, a single row or column will be added). To delete one or more rows or columns, select them and press the Remove Row(s) or Remove Col(s) button. Note that all Layers have the same rows and columns.
Within this dialog, the first column of the table is where you enter the values for the independent (row) variable; the first row of the table is where you enter the values for the second independent (column) variable, and the remainder of the table is where you enter the values for the dependent variable (the result).
The fields in the table only accept numbers (they do not accept links). You should not append units to the numbers. The assumed units for the values that you enter are the units specified for the three variables on the main Lookup Table dialog. These units are displayed in the row and column headers (for the Row and Column Variables) and at the top of the dialog (for the Dependent Variable).
You can paste data from a spreadsheet, Word document or comma delimited text file into a Layer of a 3-D table. To paste data from the Windows clipboard into a table, simply click once in the cell representing the upper left-hand corner of the region of the table into which you wish to paste the data, and press Ctrl+V.
When you paste data into a table, GoldSim will overwrite any data existing in the target region, and if necessary, will automatically expand the size of the table (i.e., add rows and columns) to accommodate all of the data being pasted.
In addition to entering the data by hand, or pasting from
another application, you can also import data directly from a specially
formatted text file. This is discussed further in the
The values of the Row, Column and Layer Variables must increase monotonically as you move downward or across in the table. When you press OK to close the dialog, GoldSim automatically sorts the rows and columns into the correct order, and also deletes all empty rows and columns.
Note: If, after defining a 3-D Table, you change the units for one of the variables without changing the dimensions An output attribute for an element that defines the dimensionality (in terms of Length, Time and other fundamental dimensions) of the output. (e.g., from feet to meters), GoldSim will automatically convert the existing data in the table to the new units. For example, if one of the entries for a dependent variable was 1 ft, and you changed the units for the dependent variable to meters, GoldSim would automatically convert the entry to 0.3048 meters. If the units are changed in such a way that the dimensions for the variable are different, the numbers will not be changed.
Note: When a Lookup Table is linked to a spreadsheet or database, you cannot edit the data once it has been imported; you can only view it. If you wish to edit the data, you must first remove the link to the spreadsheet or database (by changing Data Source A source of data external to your GoldSim model that can be automatically imported into GoldSim elements. External data sources are either spreadsheets, text files, databases or DLLs. to “None”).
- Building a Dynamic Lookup Table
- Controlling Interpolation and Extrapolation for a Lookup Table
- Importing 1-D Lookup Table Data from a Text File
- Importing 2-D Lookup Table Data from a Text File
- Importing 3-D Lookup Table Data from a Text File
- Returning the Minimum or Maximum Value of the Dependent Variable
- Specifying Data in a 1-D Lookup Table Manually
- Specifying Data in a 2-D Lookup Table Manually
- Specifying Data in a 3-D Lookup Table Manually
- Steps for Defining a Lookup Table